The release of Windows 8/10 saw some issues arise. Further updates helped solve some of them, but many such errors were still not solved. One of these is the error with the hex code 0XC000021A. While updating Windows, one standard error is ‘preparing to configure windows,’ here is the fix.
To Fix Error 0XC000021A in Windows 8 and 10, Booting Windows Manually, Let Windows Repair itself, or Reset the computer’s BIOS.
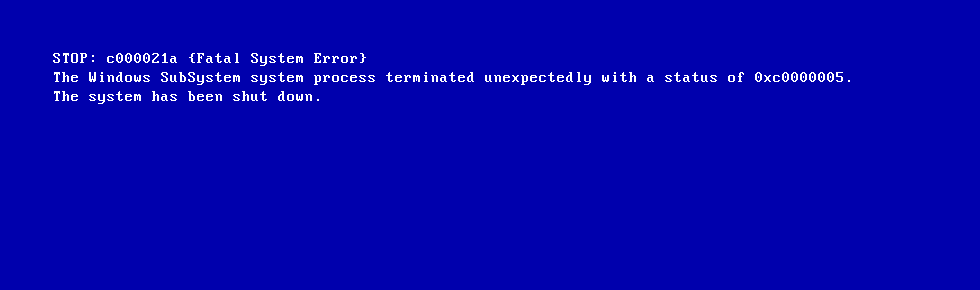
Error 0xC000021A (STATUS_SYSTEM_PROCESS_TERMINATED) occurs when critical processes like WinLogon (winlogon.exe) or the Client Server Runtime Subsystem (csrss.exe) fail. The kernel raises the STOP 0xC000021A error after detecting the failure.
See Also : [Solved] How To Fix Class Not Registered Error In Windows
Table of Contents
The reason behind the error:
Problem:
When you start your computer, it shows a Blue Screen of Death. It displays the failure report “Your PC ran into a problem and needed to restart.” The error persists even if you restart your PC. There may be some severe issues damaging the Windows OS internally. Doing a System Restore doesn’t work too.
So, let us know the reasons behind this error 0XC000021A.
Causes:
There are two files, namely:
- Winlogon.exe: Used in handling the login and logout processes.
- Csrss.exe: This is a part of Microsoft Client or Server’ Runtime Server Subsystem’.
It happens so that when these files are damaged, the error occurs. These files may get damaged due to the mismatch of system files, installation of incorrect device drivers, or third-party software missing some files.
See also: 3 Ways to Fix Overwatch Console Error LC-202
Fix Error 0XC000021A in Windows 8 and 10
Booting Windows Manually
Booting Windows manually generally solves the problem. Doing that in safe mode doesn’t usually work, so we need to use force drivers to have a signature disabled option inside the Advanced Boot Options.
Follow these steps:
- Restart your computer by holding the Shift key and clicking the Restart option. In case the Restart option is not accessible by you, then you might need to use a Windows bootable USB to boot.
- As for the next step, you will find yourself on an options screen. Out of the options given, select Troubleshoot. This will permit you to access the advanced tools.
- In the next screen, choose Advanced Options.
- On the Advanced options screen, plenty of options will be available. Out of all these options, you need to click on Startup Settings.
- There would be some options to select from in the Startup Settings screen. They would be labeled with Function keys from F1 to F9—Press F7 marked as Disable driver signature enforcement.
- Now your PC will restart with your chosen option. There would be different selections offered. You can select any of them and adjust your computer until you find the right one which works for you.
See Also: Boot Windows 8 In Safe Mode from Bios? | Easy Guide
Let Windows repair itself
Windows can automatically scan your computer and locate the problem. How?
- Hold down Shift and click on Restart to restart your PC. This is similar to the previous method.
- Choose Troubleshoot out of the options given.
- In the next screen, choose Advanced Options.
- Now you have the critical tool in the Advanced Options screen. Select Startup Repair.
Windows shall scan for the problem causing your computer not to boot and try to fix it automatically.
Reset the computer’s BIOS.
A computer’s BIOS can be reset by temporarily removing the CMOS battery from its motherboard. This does not work with laptops, as their motherboards are not easily accessible. Try this to fix the error of 0XC000021A.
- Shut down your PC.
- Remove all power cables, ensuring the computer is disconnected from any electricity.
- Open the computer’s chassis.
- Determine the CMOS battery on the motherboard and remove it.
- Wait for 1 or 2 minutes.
- Replace the battery in its slot.
- Put the casing back together.
- Start your PC and check if it successfully boots.
Replace the Corrupted Hive Files with Backups
When Windows boots, it tries to access some essential registry hive files. But if these files are damaged or corrupted, Windows cannot access them. As such, we need to replace these files with their backups.
 But since Windows does not start, you cannot do it using File Explorer. You must get into the Windows Recovery Environment and use the Command Prompt. To get into the Windows Recovery Environment, you will need a Windows installation USB or disc, for the same version of Windows is currently installed in the system.
Now follow these steps:
- Insert the installation disc or USB and restart.
- As it starts booting up, get into the BIOS settings.
- Configure it to boot from installation media instead of HDD/SDD.
- Save changes and exit BIOS.
- Press any key to boot from the installation media.
- Select time zone, language, and keyboard layout, and click Next.
- When you reach a screen with the Install Now button in the center, find a Repair your computer button in the bottom left corner. Click it.
- You will arrive on the Startup Options screen.
- Click Troubleshoot and then Advanced Options.
- Click on Command Prompt.
- Type c: in the Command Prompt and press Enter. Also, type the corresponding letter if you have Windows on any other partition.
- Type cd windows\system32\config. Press Enter.
- Type dir and press Enter. This will show all files and folders in the directory.
- Type ren (filename) (filename).old and press Enter for each file.
- After you have renamed all the files, type cd RegBack, and press Enter.
- Type dir and press Enter.
- Type in the following commands:
copy /Y SOFTWARE
copy /Y SAM
and copy /Y SYSTEM
Now, close Command Prompt and come out of the Windows Recovery Environment. To effect this, type EXIT and press ENTER. Restart your PC and see if the error has been removed.
FAQS
Can a faulty hardware component cause error 0xc000021a?
A faulty hardware component, such as a failing hard drive or memory module, can trigger error 0xc000021a. Perform hardware diagnostics to identify any potential hardware issues. If faulty hardware is detected, replace or repair the component to resolve the error.
What if I can't boot into Safe Mode to fix the error?
If you cannot boot into Safe Mode, you can use the Windows installation media to access the Advance Startup Options. From there, you can try various troubleshooting steps, including running automatic repair, using the command prompt, or performing a clean installation of Windows.
Can malware cause error 0xc000021a?
Yes, malware infections can lead to error 0xc000021a. Run a thorough malware scan using reputable antivirus or anti-malware software to detect and remove malicious programs. Ensure your antivirus software is current and perform regular scans to prevent future infections.
How can I update drivers to resolve error 0xc000021a?
To update drivers, visit the manufacturer's website for each component (e.g., graphics card, chipset) and download the latest drivers compatible with your version of Windows. Install the update drivers and restart your computer. This can help resolve compatibility issues that may trigger error 0xc000021a.
Can a Windows update causes error 0xc000021a?
While rare, a problematic Windows update can trigger error 0xc000021a. If you suspect a recent update is the cause, try booting into Safe Mode and uninstalling the problematic update. You can also use the Windows Update Troubleshooter to identify and fix any issues relate to Windows updates.
What if none of the troubleshooting steps fix error 0xc000021a?
If none of the troubleshooting steps resolve error 0xc000021a, it is recommended to seek assistance from a professional technician or contact Microsoft support. They can provide advanced diagnostics and guidance to help identify the root cause and provide appropriate solutions.