The Realtek HD Audio Manager is an ideal software to effectively use and control your PC’s sound system. It allows you to communicate directly with sound cards and speakers built in your motherboard, hence acting as a realtek audio control panel. It also automatically recognizes new audio devices like earphones or microphones trying to connect to your PC. However, often there are times when Realtek HD audio manager missing becomes an issue. Read on to solve this.
This can generally be because the newest version available online for installation has some faults, or you have not installed the correct version suitable for your device type. You will notice this error frequently with Realtek audio manager windows 10. That being said, it is a useful application to keep on your device as iterated before, so here are some simple measures to fix the Realtek HD audio manager missing from the realtek control panel.
Table of Contents
Method 1-Enabling The Software From Task Manager
To solve the Realtek audio driver missing issue, you can first start off by using this simple rectification process.
- Start by opening up the ‘Task Manager.’ You can do so by right-clicking on any empty space on the taskbar, then selecting it from the given set of options that come up.
- Next, from the set of options on the top, select the ‘Startup’ tab.
- Scroll down and look for the Realtek HD audio manager. If its status is disabled, then right-click to select the enable option.
- Finally, restart your computer, after which you can check the taskbar. The icon should display up.
If this has not fixed your Realtek HD audio manager missing issue, then the next method might help.
Method 2 – Update The Audio Drivers
Another foolproof approach to solving the realtek audio manager missing problem is updating the PC’s audio drivers. Try using the subsequent procedure.
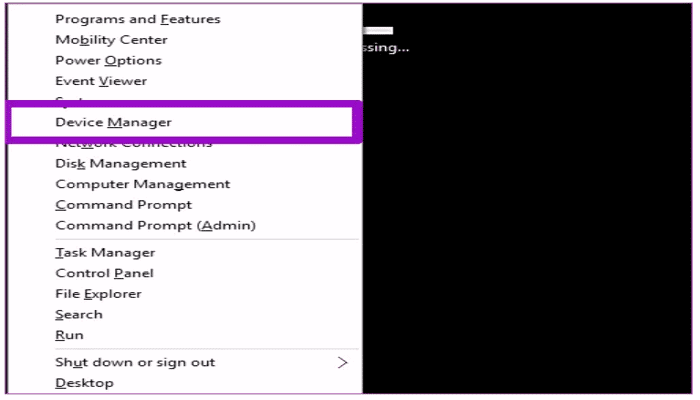
- Begin by typing ‘Device Manager’ into the taskbar.
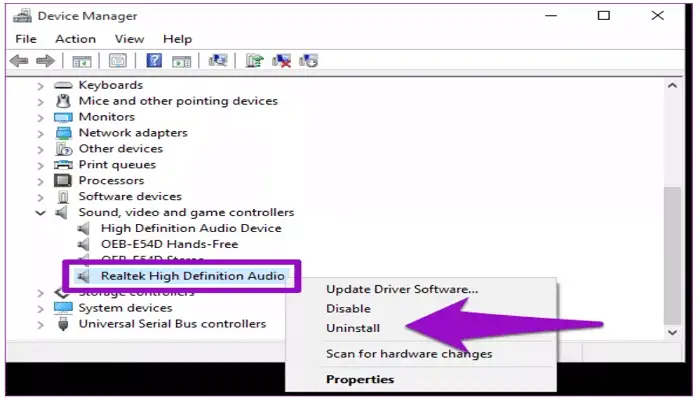
- Select and look for ‘sound, video, and game controllers.
- Open the folder and see Realtek sound manager.
- Right-click on those mentioned above and then select ‘update driver.’
- Finally, a window will come up, select the option from it titled ‘search automatically for 6. updated drive and software’.
- You must restart your electronic device after you have completed the update process.
- Now, locate the icon via surveying the control panel.
Learn how to solve the ‘No Audio Output Device is Installed’ Error. Click here!
Method 3- Reinstalling The Software
Several sources online offer audio drivers to download, but most of them don’t work. So if you already possess the software on your device, start off by uninstalling it. To do so,
- Begin by inputting ‘Control Panel’ into the search bar, then click it.
- Modify the ‘view by’ option from ‘category’ to ‘large icons’
- Next, choose ‘Programs and Features.’
- Select ‘Realtek HD audio driver’ and proceed to uninstall it.
- Once the uninstallation is over, a prompt will come up, requiring a restart of the PC. Select ‘Yes’ and permit the same.
Once you have installed the software, it is time to delete the Realtek files from your PC. This step depends on whether you hold these files or not. Not having it is completely fine. You can directly continue with installing the software.
Delete The Program FIles
- Click on ‘This PC’
- Select ‘Local Disk C’
- Select ‘Program files’ and locate the Realtek folder. Right-click, then delete it.
- Next, return to the ‘Local Disk C’ options. Select ‘Program files(x86). right-click and delete.
Now, begin with the installation. Start by copy-pasting the given link, which will direct you to a website from which you’ll be ready to download the application without any faults.
- Click on “https://www.station-drivers.com/index…” or go directly to Realtek’s website.
- Find and select the appropriate software for your device. Ensure its the newest version
- After the download is complete, right-click, select ‘show in folder.’
- Now double-click the file, click on the three dots that show up on the tab that pops up. This will open the ‘browse for files’ option.
- Now select the ‘make new folder’ option from below and name it ‘Realtek.’
- Select ‘okay.’ Afterwards, click on ‘extract.’
- Once the process is complete, click on the new folder and search for ‘setup.exe.’ Double click. Allow it to make changes to the PC by selecting the ‘yes’ option.
- Select the ‘yes’ option again on the new tab that pops up and finally, select the ‘I want to restart my PC’ option and click on ‘finish.’
Once you have downloaded the software, you can once again click on the ‘start menu’ option, search for ‘control panel,’ click on it, and after that, you will find the missing Realtek audio manager.
FAQs
Is it possible to install Realtek HD Audio Codec Driver(RACD) once again if it is deleted?
Yes, it is very much possible. All you have to do is get rid of all current drivers in your PC and follow up by loading the Codec audio. Once it has completed the job of downloading, you may press on the driver to begin its installation. The device will ask you to verify and proceed with the changes and all you have to do is confirm and you will be done.
I am being unable to see the audio software of Realtek inside my Device manager- What should I do?
If the driver software is not showing on your computer's Device Manager(DM), the reason could very plausibly be due to drivers that are not updated, Also, it could also be caused due to certain missing files. This minor problem may be resolved by simply updating the app software in the DM. Another method that can be done to make the recurrent problem go away is to go for the update by Microsoft in the app settings and the user can then use it to update the software without hassle.
Realtek software is unavailable- is it possible to get it back?
There is a simple method to achieve this. You have to open your computer and go to your DM first. Then you must select the
I want to use RACD- how should I do it?
There is a very simple method by which this can be done. You must go to your PC’s start option and press on the control panel. Or you could click Windows+R and then put in the words “control panel” inside the Run bar and then press the button on it to open it. Once you are in there, you may have to visit the option of Small Icons. Then, press on View and you have to look up the RACD from the list provided there. You may now press on the option to open it on your computer.
I do not want to use RADC but the software keeps being reinstalled- what should I do?
Uninstalling the software available for RADC might seem like the best option here, but it is probably not the way to go. This is because Windows will detect that the software may have been uninstalled and then it will now reinstall the same all over again and this will not solve your purpose. So, the failproof way to go about this is to disable the HDA manager as Administrator. You can do this by directly going to your Device Manager and you will find the option there. This will stop the Microsoft OS from installing the RACD software automatically again and again.
Is it mandatory to have the Realtek Universal Service for good quality of sound?
Not really. This service is not mandatory for the device as is mentioned in the software manual provided by Microsoft themselves. However, keeping it does ensure better audio performance by the operating system and is very much recommended by critics.
Conclusion
So here are the most straightforward solutions on the web to solving the Realtek HD audio manager missing problem. The software does tend to cause trouble occasionally due to windows updates or if you haven’t installed the drivers correctly, but these simple solutions should rectify the error.
Visit: Youtube for a detailed step-by-step video on rectifying this problem.
Also, read our article about the 6 Best Audio Enhancer Tools for Windows. Click here!


