APN is also called Access point name. It’s a setting through which your phone sets up a connection to the gateway between the carrier’s cellular network and the internet. Any device connecting data must be configured with an APN to present the carrier. It will then decide what kind of network should be provided by the identifier examined by the carrier. Thus, you must know about Consumer Cellular APN Settings.
To locate your APN settings, go to your Menu and then navigate to Settings > Wireless and Networks > More > Mobile Networks > Access Point Names. Once you’ve reached the Access Point Names section, tap either the “Menu” or “Options” button, followed by “New APN,” “Create APN,” or a circle with a plus sign to add an APN.
APN is primarily used to find the correct IP address to identify a device on the network. Consumer Cellular is a mobile service provider that operates under Mobile Virtual Network Operator. Earlier, it used only AT&T infrastructure; now, it also uses T-Mobile infrastructure. If you’re changing your APN, you must face problems with the internet connection or the MMS. Well, here’s how you can fix them. If things are not working out with your old APN, maybe it’s time you add a new one.
See also: AT&T APN Settings | Step-by-Step Guide
Table of Contents
What are APN settings?
The way of networking for all cellular data connections is known as APN or Access Point Name. Some carriers now require manually entering the APN settings to set up cellular services. The APN can be viewed only on the iPad or iPhone if the carrier permits viewing it.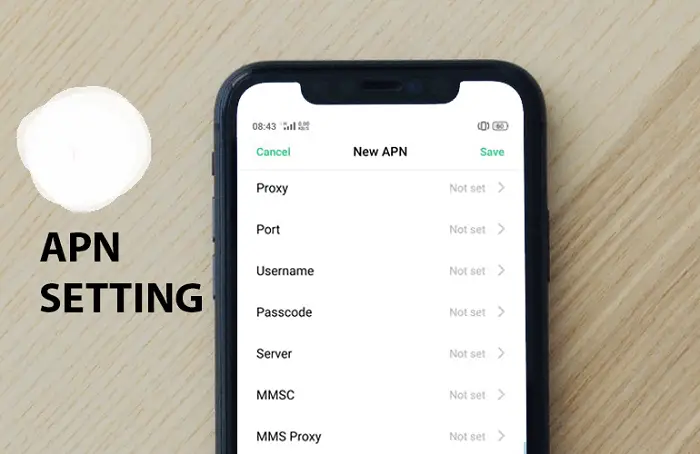
After inserting the SIM card into the device, the carrier searches for the network, automatically sending an APN file. There are simple and quick steps to fix the cellular APN settings of Android, windows phones, etc. Here in this article, there’s a piece of detailed information on the same. Also, don’t forget to check out this step-by-step guide on APN settings for LycaMobile!
Consumer Cellular APN
Consumer Cellular, a mobile network company in the United States, was founded in 1995. Portland, Oregon, United States, has the company’s headquarters. Greg Pryor is the company’s founder, and John Marick is the CEO and founder of the company. The latest addon in the feature is done by the launch of 5G networks for the latest 5G devices.
This article will teach you about APNs, including what and how to change.
Although before changing anything in your settings, there’s something you need to keep in mind. You don’t want to mess with your phone’s settings because that would lead to the malfunctioning of your device. So, while filling in the details of the new APN, it’s vital that you put the exact text I’ve given. That includes every comma or space or even capitalized letter.
Even the tiniest change in the text can affect the setting, and it might not work correctly. Before switching the APN, deleting all the other non-working APNs is recommended. Once the changes have been made, don’t forget to save them. And once the process is complete, reboot your device.
See also: Straight Talk APN Settings – Step-by-Step Guide
Consumer Cellular APN Settings for Android Phones
If you are using Android, here’s the step-by-step configuration you must follow.
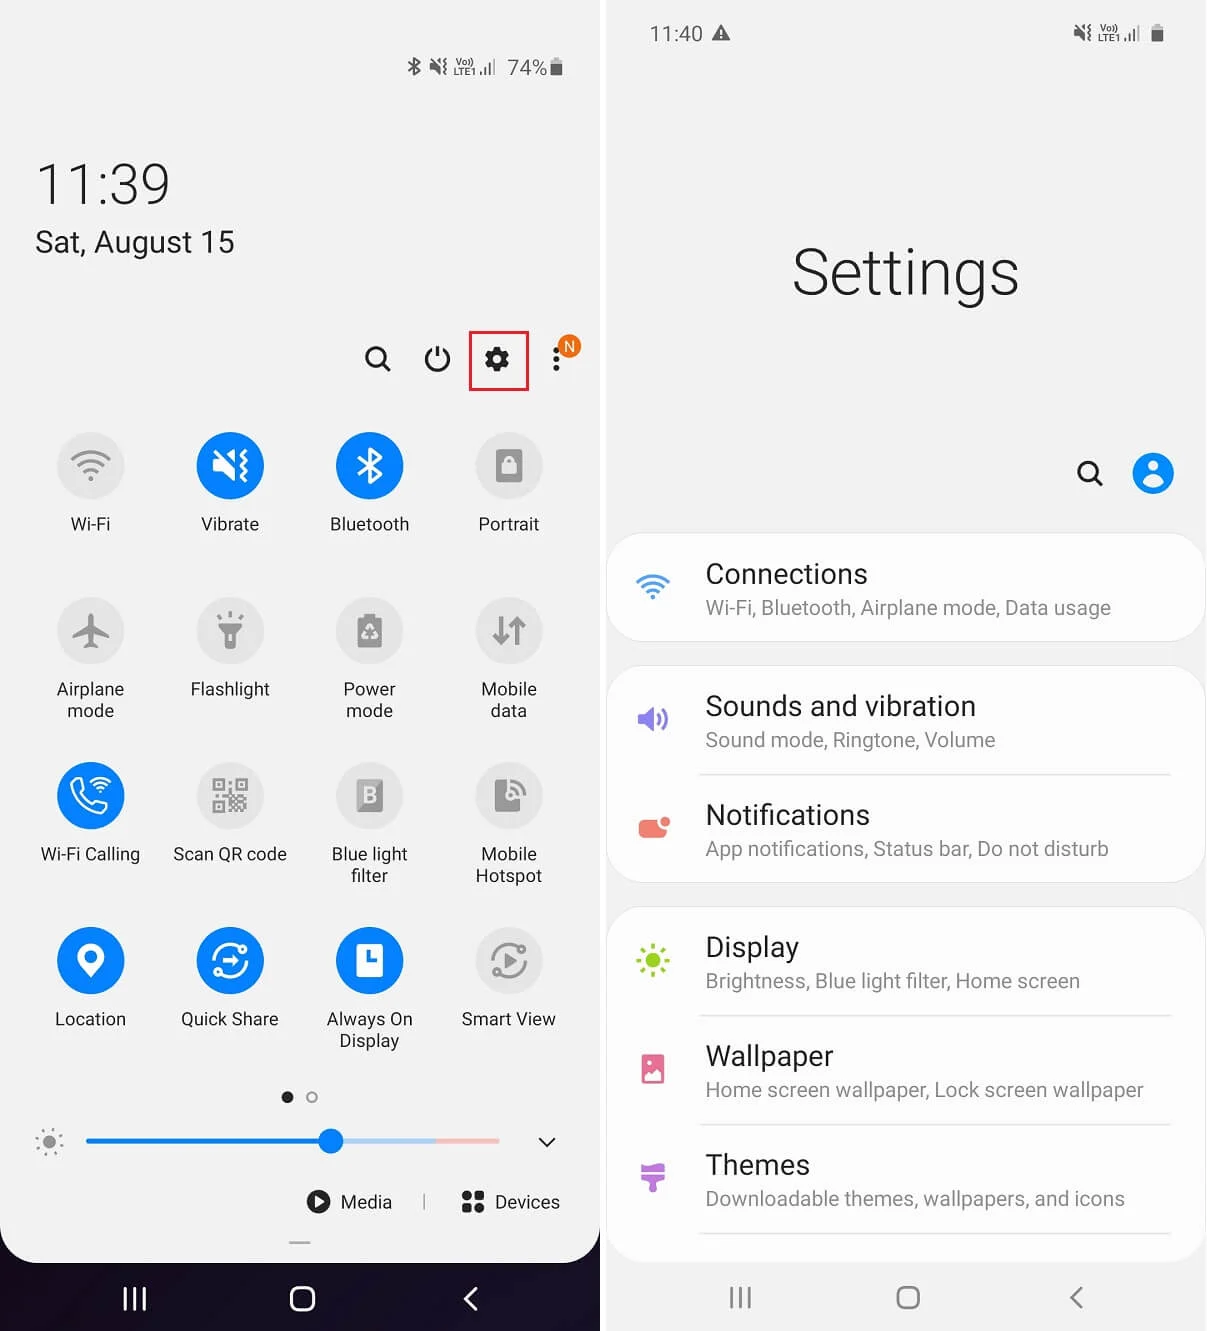
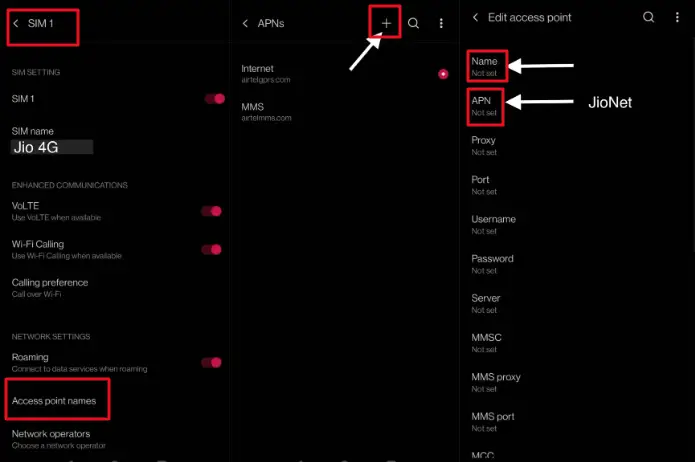
- First, go to settings by sliding the notification bar or the main Menu.
- Tap on More>>Mobile network>>Access point names
- Always create a new APN by tapping on ‘+‘ at the top right corner.
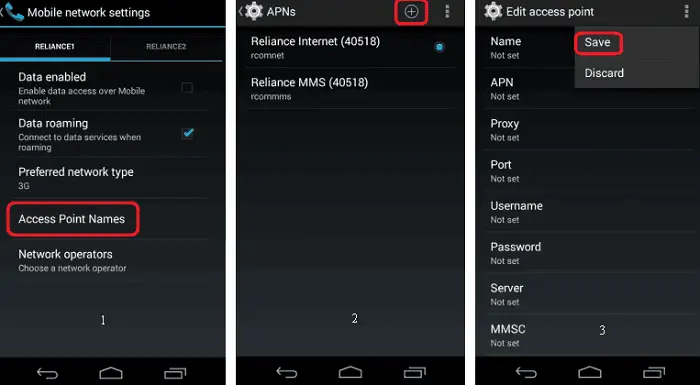
- Enter the details as given above and the exact manner
- Save the settings
- Reboot your device

APN Name: ConsumerCellular
APN: att. mvno
Proxy: <Leave blank>
Port: <Leave blank>
Username: <Leave blank>
Password: <Leave blank>
Server: <Leave blank>
MMSC: http://mmsc.mobile.att.net
MMS Proxy: proxy.mobile.att.net
MMS Port: 80
MCC: 310
MNC: 410
Authentication Type: None
APN type: default,mms,agps,supl,fota
Protocol: IPv4
APN Roaming Protocol: IPv4/IPv6
Bearer: Unspecified
MVNO Type: None
See also: metroPCS APN Settings | Step-by-Step Guide
Alternate Setting for the Same
APN Name: ConsumerCellular
APN: att. mvno
Proxy: proxy.mvno.ccmobileweb.com
Port: 80
Username: <Leave blank>
Password: <Leave blank>
Server: http://mmsc.cingular.com
MMSC: http://mmsc.cingular.com
MMS Proxy: 66.209.11.32
MMS Port: Not set
MCC: 310
MNC: 410
Authentication Type: PAP or CHAP
APN type: Not set
Protocol: IPv4
APN Roaming Protocol: IPv4
Bearer: Unspecified
MVNO Type: None
See also: Cricket Wireless APN Settings | Step-by-Step Guide
Consumer Cellular APN Settings for Windows Phone
Windows users, here are the steps you must follow to change your APN settings.
- Go to settings from the Menu or scroll down the notification bar.
- Select Networks and wireless.

- Open Mobile + Sim
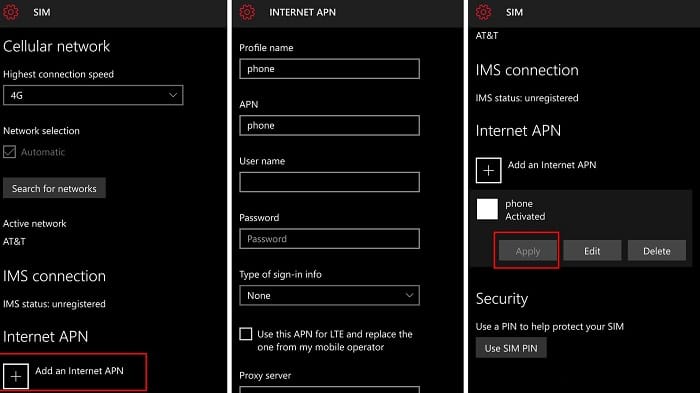
- Select Sim settings.
- Press the Menu and choose New APN.
- New APN settings will open. Enter the corresponding settings as given above.
APN Name: CCI LTE
APN: att. mvno
Proxy: not set
Port: not set
Username: not set
Password: not set
Server: http://mmsc.mobile.att.net
MMSC: http://mmsc.mobile.att.net
MMS Proxy: proxy.mobile.att.net
MMS Port: 80
MCC: 310
MNC: 410
Authentication Type: PAP
APN type: default, mms, supl
APN Protocol: not set
These settings should be entered the same way. Otherwise, they might not work correctly with your device.
See also: Net10 APN Settings | Step-by-Step Guide
Consumer Cellular APN Settings for iPhone
If you are using iOS, i.e., iPhone, here’s what you can do to change your APN settings.
- From the main Menu, go to the cellular setting.
- Confirm that the Cellular data is turned on.
- Now go to Cellular data network and enter the APN settings as given above.
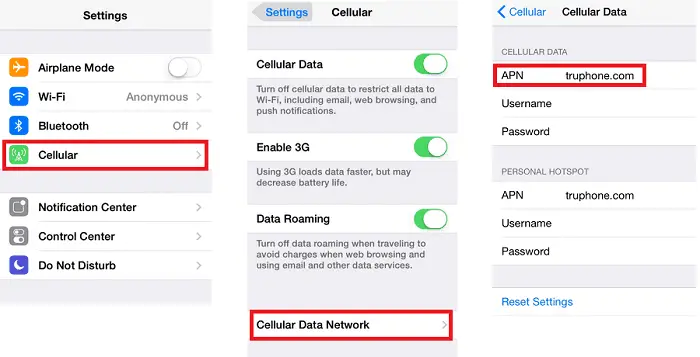
- Save the settings and reboot your device.
APN Name: Everywhere
APN: leave blank
Proxy: leave blank
Port: leave blank
Username: eesecure
Password: eesecure

See Also: Family Mobile APN Settings | A Step By Step Guide
For MMS and Virtual voicemail settings, enter the following settings:
APN: Everywhere
Proxy: leave blank
Port: leave blank
Username: eesecure
Password: secure
Server: http://mmsc.mobile.att.net
MMS Proxy: 149.254.201.135:8080
After entering the settings correctly, press the black arrow thrice and go to the home screen. If the mobile network is not available, reboot your phone. Read this article to know more on GoSmart APN Settings | Step by Step Guide.
NOTE: If you do not see the ‘Cellular Data Network’ option on your phone, that means your phone is not unlocked, and you can’t use any different carriers, nor can you change the APN settings of your phone.
See also: Family Mobile APN Settings | A Step-by-Step Guide
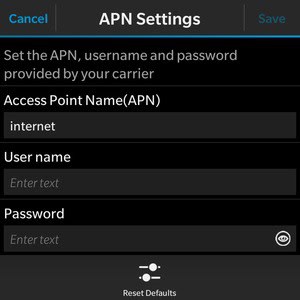
Consumer Cellular APN Settings for Blackberry 10
If you are using Blackberry, here are the steps you need to follow to change your APN settings.
- Go to settings
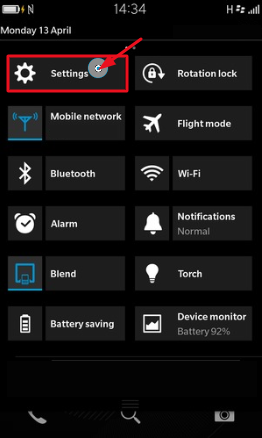
- Press Network connection
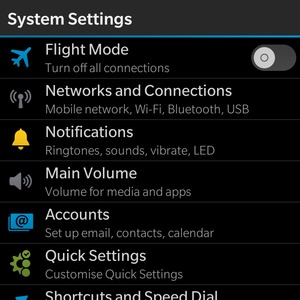
- Click on the mobile network
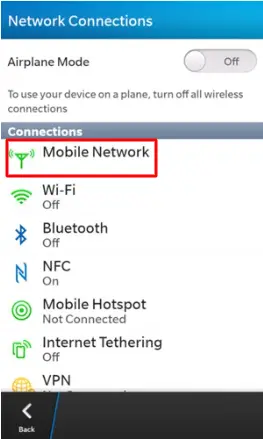
- Open APN and enter the following details.
See also: Simple Mobile APN Settings | Step-by-Step Guide

APN: everywhere
Username: eesecure
Password: secure
For MMS APN, enter the following details:
APN: att. mvno
Username: leave blank
Password: leave blank
Once you have entered all the details correctly, save them and check if the mobile network is available. If it’s not, try rebooting your phone.
See also: Tracfone APN Settings | Step-by-Step Guide
Frequently Asked Questions
Can I set up APN for the data services?
The steps to set up the settings of APN on an Android device are given here. From the house screen of the device, go to the Menu button. Then, tap Settings and go to Mobile Networks. Choose Access purpose Name and then Tap the Menu button. Select New APN and then Name field. Enter the web and confirm.
Which carrier is used by Consumer Cellular to detect networks?
Consumer Cellular gives for T-mobile and AT&T, wireless service victimization. Also, the reselling of wholesale wireless services of AT&T is done by alternative virtual operators. The corporate has been enclosed on the Iraqi National Congress 5000 list united of America's quickest growing corporations once, since 2009.
What makes us understand which APN to use?
For checking the APN settings on mobile, swipe up from the house screen to access your apps. After that, tap the Settings app and go to Connections. Select Mobile networks and choose Access purpose Names. Then select the Access option you'd prefer to check.
What to do if every time no network is there on Consumer cellular phone?
If the Consumer cellular phone says 'No Service' on the phone, then follow the steps. Suppose the 'No Service' message stays on. In that case, you'll be in an exceeding location where the cellular signal is too weak, like a subway or mountain depression, or a cellular tower isn't shut enough to your phone. Weather or environmental conditions can also be an element.
Which network does Consumer Cellular use - CDMA or GSM?
GSM network is the network used by Consumer Cellular. Consumer Cellular operates on what is known as a GSM network. It is the same style of network utilized by AT&T and T-Mobile, which means that you simply can have the most effective probability of success switch if your phone is from one of those 2 GSM phone carriers.
Does the 4G network is supported by Consumer Cellular?
When using Consumer Cellular, all the mobile devices support the 4G LTE. Consumer Cellular has its LTE network spread in more areas all through worldwide. You'll look into our choice of cheap smartphones to search out specific data concerning every phone's specifications.
Conclusion
There were the Consumer Cellular APN settings for Android, iPhone, Windows, and Blackberry. Just follow the corresponding steps to enjoy the internet without any trouble. If you can’t find any particular setting option on your phone, there’s nothing to worry about.
Different phones have different settings under different names or options. Just check thoroughly; it might be there under a different name. I hope this article was helpful to you.