Following The Alpha’s retirement, Joker moved as an independent developer, with the Wizard for the Builds, and Jokers TV, which is now called the Maverick TV. It is an all-in-one add-on, with sections included for TV-Series, Movies, Music, Radio, News, Entertainment Channels, Live Sports Channels, and watching Live TV on Kodi, Documentaries, and more.
The Maverick TV Kodi addon is a must-have for new users out there. Thus, you must know how to Install Maverick TV Addon on Kodi.

There are hundreds of add-ons that you can integrate into Kodi, but due to Geo-restrictions, many users around the world might be unable to use the add-ons that they download. With a VPN, however, digital barriers disappear, making every Kodi add-on accessible from anywhere globally. Also, check out our guide on how to set up and watch Pay-per-View on Kodi.
Table of Contents
Maverick TV addon on Kodi
If you aren’t already using a VPN service, start today and protect your activity on the web, establish a protected internet connection, and stop ISP surveillance and invasive advertisement trackers. It is strongly recommended to use a trusted VPN service such as the well-known IPVanish.
Now, to install the Maverick TV addon on Kodi, we will begin with the installation method for Kodi V17 or better known as Kodi Krypton. Users of the older version of Kodi, i.e, V16/Kodi Jarvis, should scroll down below to look for the steps shown in their version. Everything will be explained in great detail. Let’s begin!
See Also: How to Install Exodus on Kodi Version 16 Jarvis Version 17 Krypton
Steps To Install Maverick TV Addon On Kodi
If you have a clean install of Kodi 17 on your system, you must enable the unknown sources option first. You can skip the first three steps if you are using the older version of Kodi, i.e. Kodi V16 (better known as Kodi Jarvis) & move to the next ones to install the Maverick TV addon on Kodi.
- Open your Kodi Media Centre on your media device or computer. Click open the settings menu to your right on the screen. Select System Settings and then click on Add-ons.
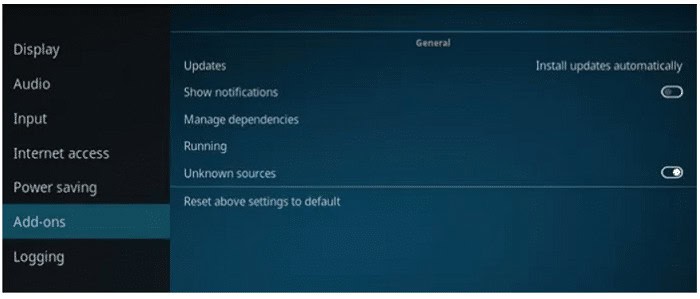
- Here you will see the option that is Unknown Sources.

- Toggle this on. You will receive a warning message/pop-up reading the following:
“Add-ons will be given access to personal data stored on this device. By allowing, you agree that you are solely responsible for any data loss, unwanted behavior, or damage to your device. Proceed?” If you wish to install ANY third-party add-ons, you must agree to this.”
- Select File Manager under System Settings from your main menu screen on Kodi. Double-click on the Add Source button.
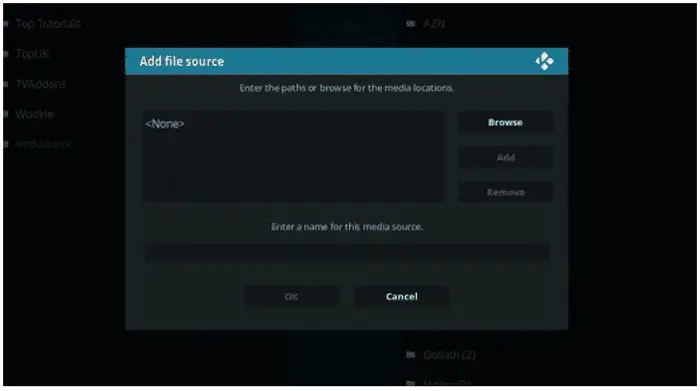
- You will see a highlighted text that says <None>; click on this. Below it, there should be an empty box. Type the exact following URL here: http://mavericktv.net/mavrepo/.
- Once you finish typing the URL, click Done to finish adding the source link. Now, let’s proceed further in installing the Maverick TV addon on Kodi.
- The newly added repository source will need a name. To select the box under the line “Enter a name for this media source.” For ease of consideration, let’s say you name it “.Maverick” for now. You can give any name you would like as long as you remember this later on. The small dot added as a prefix in the repository’s name is a solution that will prevent your new media source from mixing with the local folders. Not doing so will push it down further on the list of media sources since Kodi arranges files alphabetically. So, type the name “.Maverick” and then click on Done. Press “OK.”
- It should now be added to your list of media sources. If this is missing from the list, the reason may be the internet connection being down or the URL being inactive at the time you are trying to access it.
- Navigate to Kodi’s main screen and select the Add-ons option from the System Settings menu. Click open the option “Install from zip file.”

- Click on the. Maverick or whatever name you had typed for the Maverick repository earlier. Now, click on mavrepo.zip
- The installation of the Maverick TV addon on Kodi may take some time. When it completes, you will see a message reading Add-on enabled. Depending on the Skin that your Kodi is using and the Build you use for Kodi, the message may appear in somewhat different locations. You can also see the indication “Enabled” next to the add-on’s name.
- Moving on, select the option “Install from repository” and then click on MaverickTV Repo.
See Also: 20 Kodi Skins You Must Install | Updated 2023

- Go to the Video add-ons section and choose maverick Kodi. Finally, click on Install!
- This installation will take a few seconds; once complete, you should see the Add-on Enabled Notification on your Kodi screen. Voila! You were able to install the Maverick TV addon on Kodi.
Maverick TV is now installed successfully on your system. You can look for it anytime you want the section Video add-ons. As this is a third-party add-on, it is not in support by the official team of developers for the Kodi Media center.
This means that you can not contact them on the official forums about any query that you may have on how to install Maverick TV Addon on Kodi. Any complaints or requests should redirect to the developers of the Maverick TV addon itself.
See Also: How To Install Smooth Streams On Kodi? Easy Guide
FAQs
Is Maverick available on Kodi?
It is undoubtedly one of the most potent Kodi plugins. It has numerous perks that helps in smooth video streaming.
Is Maverick still streaming on Kodi?
Yes, you can access Maverik by installing the addon on Kodi. t is among the most beneficial add-ons.
Will Maverick stream for free?
Generally, Maverik charges a fixed price after the 7-day free trial period. You can get access to them without paying by using third-party programs.
What does Maverik stream?
Maverick offers a wide range of entertainment, from movies, music, sports, and news.
Disclaimer
This guide is to help readers access the content they already have the right to access. Techwhoop does not support piracy and bears no responsibility for what you decide to do with the information provided in this guide.
Please note that Techwhoop does not develop, host, or produce any of the software or applications mentioned in the article. We do not support using, distributing, or purchasing fully-loaded Kodi boxes or other pirate streaming devices. Support the developers! Say no to Piracy!